Friday, December 31, 2010

Christmas goodies - hostess gift & guest treats

Back in late September, I held a Christmas card making workshop for my mother-in-law's friend. It was a 3/$5 card making workshop, so each of the guests paid for supplies to make 3 cards each.

For each of the guests, I made a little treat holder using the SU! exclusive Two Tags Die for the Big Shot. Inside I put a little candy bar, which for some reason I didn't have when I took the pictures below! The inspiration for the idea was found HERE.


I try to bring some sort of hostess gift for each of my workshops. For this particular workshop, I created this cute little gift card holder (the idea and tutorial to re-create I found HERE). Instead of putting a gift card inside, I made up a little "certificate" that said she would get the 3 cards we make for free. Both my mother-in-law and her friend (the hostess) loved it so much that they wanted all the details to recreate it themselves and ended up making a few for their friends. I love to help inspire!


the "hole" is where you would slip the gift card into

Hope you're enjoying my Christmas posts...even if Christmas is OVER! Tuck away these ideas for next year if you'd like! You can get a head start. ;)

Candy Cane Christmas Event

On December 5th, I held an event called "Candy Cane Christmas". It was my first time since joining Stampin' Up! holding a Christmas themed event that involved more than just making a few cards. I was so excited for the challenge, but also felt a little overwhelmed with the preparation of it all! I had a wonderful turn out and was so pleased! There were 12 eager and excited guests who came to spend the afternoon with me and make some Christmas goodies for friends, family...or to keep for themselves (and, that's OK, too!)

The class consisted of 4 projects using the Candy Cane Christmas Designer Series Paper (found in the 2010 Holiday Mini Catalog). I was so glad that I had ordered this paper ahead of time because it ended up going out of stock at the beginning of Decmeber. I am so thankful that I decided to plan ahead or I would have been doing some major scrambling and revamping of the class! Each of the guests received 6 sheets of the Designer Series Paper (whatever we ended up not using). This was an added bonus to the class!

Paper and projects ready to hand out to each guest

I decorated clothespins that held each of the stacks together.
The guests were then able to keep their clothespin.

A few treats to share!
Don't these cookies look so yummy?
A little information station with door prize tickets, door prizes, and...

...a treat for each of the guests to take home as a "thank you" for coming.
{inspired by Jill at Jill's Card Creations}
Project #1:
Window Treat Box
{tutorial found at Angie's Chic 'n Scratch}

Project #2:

Scallop Circle Purse
{instructions to create your own can be found here}

Project #3:
Wish List Pad with Cover
{awesome tutorial found at Splitcoast Stampers}
shows the inside
up close on the front - notice the sparkle?
Project #4:

Snowflake Gift Bag
{inspired by a design I found on Stampin' Connection}

All 4 projects!
It really was a fun event, but I will definitely be making some changes next year in my planning and preparation. It was a lot of work and so much of it I waited until the last minute to do (thank goodness for moms who are willing to help!). I think partly because I had too many things on my plate. (I was a part of two bazaars that I plan to share next!) Next year, I plan to make smarter choices about filling up my calendar for the holidays!

Thursday, December 30, 2010

Stamp Club - December

It would have been really smart if I would have shared with you the projects I made or classes I held during the month of December actually IN DECEMBER, but the busy-ness got a hold of me and it just didn't happen, so I'm going to try to play catch up with some projects I'd like to share! Forgive me for the lateness, but if you see something you like you can tuck the idea away for next year!

December's stamp club was a lot of fun! The hostess wanted to make some hot cocoa holders, so I designed a couple of simple and easy to re-create samples for each of the ladies to make.

The first one was a matchbook style hot cocoa holder using the Nestle cocoa packets (I can't believe I didn't take a picture of it open!). Basically the front tucks under the flap at the top. When opened it reveals the hot cocoa packet. This would be extra cute if you tucked a candy cane somewhere.

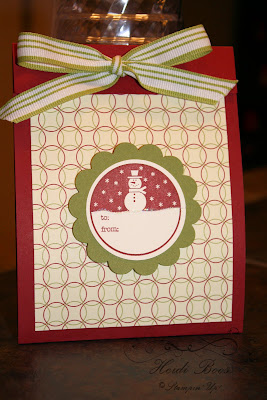
Stamp Set: Tags Til Christmas (available in wood or clear mount, but only until January 3rd!)

Paper: Cherry Cobbler, Old Olive, Jolly Holiday Designer Series Paper

Ink: Cherry Cobbler

Accessories:
X-Large Scallop punch, 1 3/4" Circle punch, Dimensionals, Dazzling Diamonds glitter, Old Olive striped grosgrain ribbon (retired), Crop-A-Dile (to punch holes to thread ribbon through)

* * * * * * * * * * * * * * * * * * * * * * * * * * *

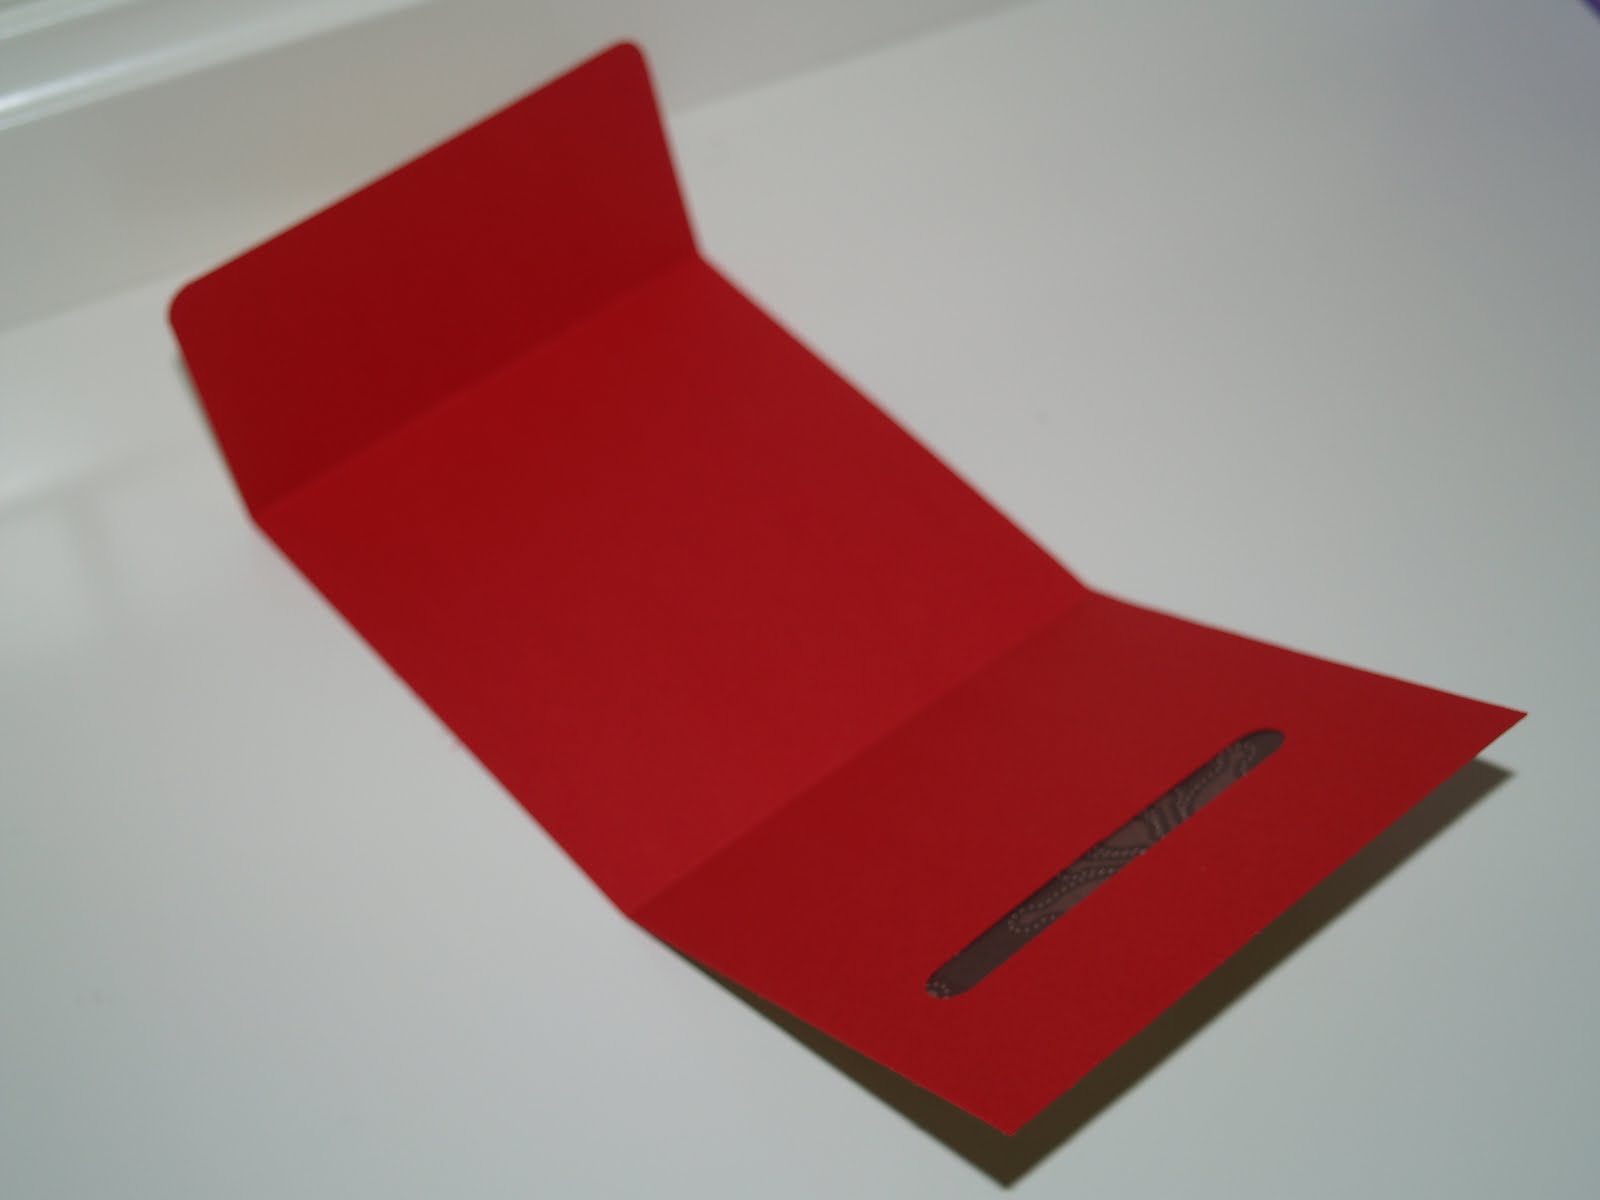
The second hot cocoa holder had a bit more steps to it. This one uses the Land O Lakes hot cocoa packets. The hot cocoa is inside the pocket until you pull the ribbon to reveal the hot cocoa.

Stamp Set: the hot cocoa image is from a retired set borrowed from my sister...I can't remember the name!, the snowflakes are from a retired hostess set from last year's catalog

Paper: Old Olive, Real Red, retired Designer Series Paper from "I Wish" Simply Scrappin' kit

Ink: Cherry Cobbler, Versamark (for the snowflakes)

Accessories:
embossing powder, Sticky Strip, 1 3/4" Scallop Circle punch, 1 3/8" Circle punch, 1 1/4" Circle punch, Real Red polka-dotted grosgrain ribbon (retired), Horizontal Slot punch (retired)

* * * * * * * * * * * * * * * * * * * * * * * * * * *

And, because it was Christmas time, I just had to give each of the ladies a fun little gift filled with peppermint-chocolate candies. I happened to find these cute little jars at Michaels crafts for only $1.00! I was hooked and snagged up 10 of them right there on the spot. I jazzed them up a bit to add some sparkle...the ladies loved them!


* * * * * * * * * * * * * * * * * * * * * * * * * * *

Here is the hostess gift for the month of December. I made this little box that has a divider in it. One side is filled with mini candy canes and the other side has little tags that can be used to dress up gift packages. I made a cover using some snowflake acetate and then tied a ribbon around the entire box.


For my other stamp club projects from November, click HERE.

Wednesday, December 29, 2010

are you Filled with Love?

Sorry to have not posted anything for the month of December! I guess the Christmas season really got away from me and before I knew it, it was all over! I hope to post some Christmas things soon to "look back" and have a record of my fun creations to get inspired for next year's Christmastime!

For now, let's move onto the next fun holiday...Valentine's Day!

Stampin' Up! has a new promotion that began on December 17th and will continue until January 24th. It's an EXCLUSIVE bundle called "Filled with Love". You'll have your choice between wood mount ($32.90) and clear mount ($26.90). When you purchase this bundle, you will also be getting something fun for FREE...Bitty Buttons (clear buttons that make the perfect little addition to your projects)!! You're able to purchase the exclusive Love Patterns Designer Series Paper (not available in any catalog) separately if you are just interested in the paper. See the details below:


The Filled with Love stamp set is currently available in the Holiday Mini Catalog, but only until January 3. But, with this promotion that lasts until January 24th, you will still be able to get the stamp set!


The paper comes in four patterns and two colors, Pretty in Pink and Real Red. 12 double sided pages are included. This is exclusive paper that you can not find in any current catalog. It is only available through this promotion, until January 24th.


And, here's your FREEBIE : Bitty Buttons! These also coordinate with the Itty Bitty Shapes Punch Pack, as well as the Itty Bitty Bits stamp set. There is so much you can do with these buttons!


Order online at heidiboos.stampinup.net or contact me today if you'd like to place an order! Valentine's Day will creep up on us quickly, so I hope that you take advantage of this offer to start working on some fun projects today!
// ADDED BY RYAN ON 1-3-14 // END ADDED BY RYAN 1-4-14